Deep Dive: MX Configuring Port Speed
Configuring MX 10K port speeds is not so straightforward as you may think, read on to find out how to avoid some stumbling blocks.
#Network as a Service #Juniper Networks #Deep Dive
MX
I was recently asked to add an MX 10003 router to a customer network. Since I haven’t done this in a while, I refreshed my memory by visiting the Juniper site, seeking some guidance.
Usually, their documentation is great, if you search the knowledge-base on how to configure port speed on MX204 or MX10003 Juniper provides these documents and tools:
https://www.juniper.net/documentation/en_US/junos/topics/task/configuration/chassis-mx10003mpc-rate-select-configuring.html#port-level-port-profile
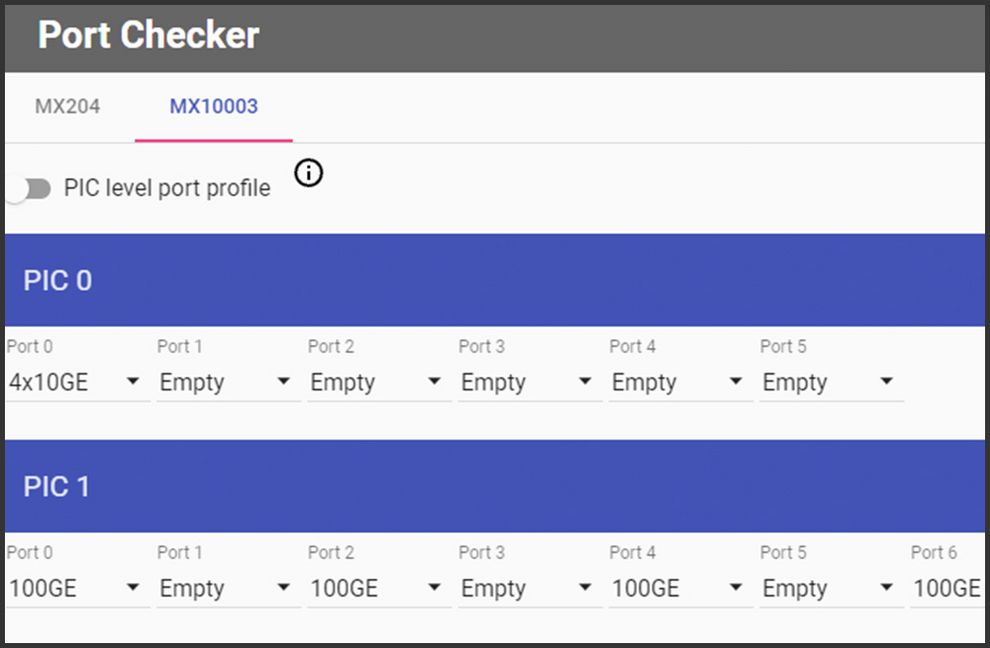
https://apps.juniper.net/home/port-checker/
But it is missing some vital information to get this to work:
- you have to configure port speed at the PIC or port level for both PIC0 and PIC1 – even if PIC1 is not installed
- for PIC level speed config where the entire PIC is set to the same speed, both PIC0 and PIC1 have to be the same speed
If you don’t do the above you will not see the output of “show interfaces terse” change to correctly show either:
10G breakout:
xe-0/0/5:0              up    up
xe-0/0/5:1              up    up
xe-0/0/5:2              up    up
xe-0/0/5:3              up    up

or 40G or 100G mode:

et-0/0/5                up    up
Full day one documentation for the MX platform is available here:
https://www.juniper.net/documentation/en_US/day-one-books/DO_MX5G.pdf
Below is an example that can help you to quickly bring up interfaces on the MX 10003. The assumption is that 4 x 100G Flexoptix QSFPs are inserted into FPC0, PIC1, ports 0, 2, 4 and 6. PIC0 is not used. In CLI this translates to 0/1/0, 0/1/2, 0/1/4, 0/1/6:

MX10003
- Ports by default are enabled but will not come up when connected.
- Both PICs need to have hardcoded speed settings, port checker shows what speeds can be set on PICs, for our MX10003:

Configuration status:
- PIC0 can’t use 100G, max is 4x10G, for whatever reason this needs to be setup even if you only want to use PIC1
- PIC1 can use 100G all the way
- Chassis config:
root@router# show chassis fpc 0 { pic 0 { port 0 { speed 10g; } } pic 1 { port 0 { speed 100g; } port 2 { speed 100g; } port 4 { speed 100g; } port 6 { speed 100g; } } } - commit
- To apply the change a restart of the port is needed. This can be done with, i.e.: request chassis pic pic-slot 1 fpc-slot 0 (offline | online)
- In case you notice issues restarting individual PIC (ports would not come up), I recommend restarting the entire FPC,
- run request chassis fpc restart slot 0
- run request chassis fpc restart slot 1
- Restart takes up to 5 minutes, check run show chassis hardware to see if the modules have initiated, the Xcvrs with QSFPs need to be listed:
Xcvr 0 NON-JNPR F712345 QSFP-100GBASE-SR4 Xcvr 2 NON-JNPR F712345 QSFP-100GBASE-SR4 Xcvr 4 NON-JNPR F712345 QSFP-100GBASE-SR4 Xcvr 6 NON-JNPR F712345 QSFP-100GBASE-SR4 - Only then you can check run show interface terse | match 0/1 to see if the interfaces became available. In this case you want to see the et interfaces, like et-0/1/0. Juniper calls 100G and 40G interfaces as et, 10G are xe.
- In case the port does not come up check RT/TX, you may need to roll them. To see if the port is sending and receiving light use show interfaces diagnostics optics (interface)
Summary
In conclusion, having good documentation is getting you on the right path, but having a knowledgeable colleague will get you across the finishing line.


